A couple things
First: I used this post as an excuse to learn how to format code on my site.
echo Prism.js is great.
The code above is formatted through a library called Prism.js.
It's fabulous and I love it.
I hope you like it too! I'm going to have a lot of code on this post for no reason at all.
It might be a little overkill but I'm excited to use it!Second: this is a convenient place to mention that all of my code is licensed under The Hippocratic License.
If you want to use my code, feel free. If you're
morally bankrupt (ICE agents, I'm looking at you!), then kindly leave.
That last part was sort of heavy. I'm sorry. On to the exciting stuff!
The problem
There are a lot of problems that can motivate this sort of post. I'm going to focus on one.
Training a neural network can take a lot of time. If it takes a while, you want to be
notified right away about the results. Did your experiment work well? Do you need another
go? What are the insights? Often, you're not training on your main laptop or desktop.
You're training on a server. So it's even harder to be aware of when an experiment concludes.
This can get super annoying. It would be amazing if I could initiate training from my phone
and get a push notification once it's complete. I could also build a small script that
sends me an email with the results. That last part is a little out of scope for this post
so I'm going to ignore it for now.
To simulate this problem, I'm going to set up a Raspberry Pi that will act as our server. In all
fairness, it basically is a server. But, it's not going to be able to train a neural network.
This post isn't about coding a net in PyTorch, though. It's about telling a server to do something
via an app you might already have! If you don't have a Raspberry Pi, you can also use a handy computer
that you have access to.
This is the problem we're solving: remote initiation of a job on a server and real time notification of
the work's completion. An added bonus: you'll be able to tell Siri to "start training on remote cluster", which
gets me as close as I've ever been to my long time dream of being Tony Stark.
Let's split up the work into two parts: the server and the phone, or, the backend and the client, respectively.
The backend
This part is super simple! All you need to do is write a script and put it somehere. If you're doing this to
remotely train a neural network, you might have a script that looks a lot like
this.
If you're just following along and want something to test with, here's a very simply python script that prints
"Hey, isn't this awesome?" after 10 seconds:
import time

time.sleep(10) # Set a delay for 10 seconds
print("Hey, isn't this awesome?")

# This code is licensed under The Hippocratic License
If you're using a Raspberry Pi or a nearby computer, put your script somewhere you'll remember. If you're using a server, I'm sure
you already have the filesystem organized the way you want, that's awesome! For this, I put the script at the root level of the
Pi. You can put it wherever you want, though!
Next, we have to make sure we have access to the backend. As the post title suggests, we're going to use SSH. If you're
using a Pi,
here's
a great tutorial from the official documentation on how to enable SSH access. You'll need to note the IP address of the Pi,
the username, and the password.
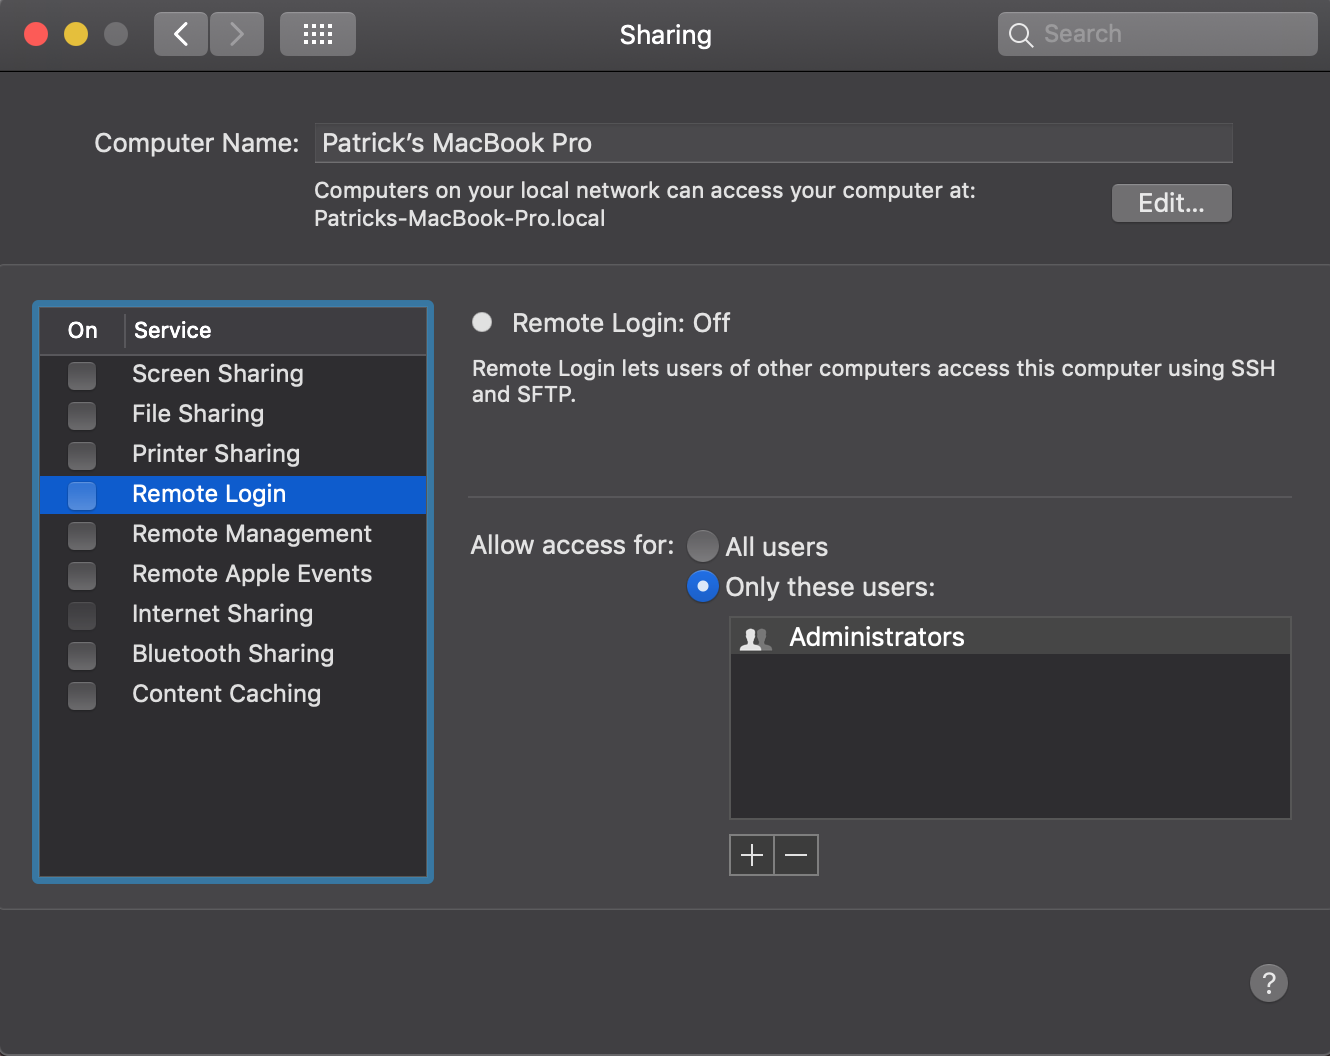
If you're using a Mac, it's really simple! Navigate to the System Preferences App and click on "Sharing". The System Preferences page for Sharing.
From here, just click on the box next to Remote Login. This will enable people to SSH into your laptop. This is probably
pretty safe if you have a password set! Once you enable Remote Login, some information will pop up that will read something
like "To log in to this computer remotely, type "ssh user@XX.X.X.XXX"". Where I've typed "user", you should see the username
of the account on the Mac that you're currently logged in to. The XX.X.X.XXX number represents your local IP address. You'll
need both of these, as well as the password you use to log in.
There are ways of doing this for Windows machines, but I don't use one so I'm not sure how! I also don't have one at my disposal
to check, so I don't feel comfortable endorsing a tutorial. There seem to be plenty, though.
If you're using a server, I'm going to bet you already know how to SSH into it.
STOP! Before you go on, make sure that you know the IP address, username, and password of the machine you're planning
to SSH into. You also need to know where you saved the script you plan to run.
The client
Awesome! We've made it halfway through! Right now you should have noted everything but your password. I say you shouldn't
have noted down your password becuase that's awful security. Never write down your password! Onto the client.
I don't know if you've played with Shortcuts before. It's amazing. It is seriously so much fun. Scratch was the first exposure I had
to programming and this reminds me so much of it. No coding is necessary for this step, though! Shortcuts works by assembling
programs block-by-block. The app provides tons of blocks for you: opening certain apps, texting and calling people, location based
queries, and programming-centric things like if statements and delays, setting brightness, and delivering push notifications.
It is super powerful and I love it.
Go ahead and open the app up. In the top right corner, select the plus button. Each block is called an Action. Click the button that
says "Add Action". Look around! There's lots of stuff here. We're interested in the "Scripting" category, so tap that. Scroll down
until you see an Action called "Run Script Over SSH". Select it, once you find it. Once you see it pop up in your list of Actions,
tap show more. A list will expand with inputs that look pretty familiar. Go ahead and fill in the Host (i.e., your IP address),
the User (i.e., your username), and the Password fields. If you're using a server, you may need to change the password type to SSH key.
Down below, there is a section for "Script". In it, we'll write the script that will be executed on the Raspberry Pi. At this point,
treat the script input here like the terminal on your remote machine. If we have a Python script on the Pi at the root level, the
script we'd type in here would look like:
python my_script.py
If your script lies in another directory, no problem!
cd path/to/the/right/directory
python my_script.py
If you were to click save, walk through the next prompts, and run this shortcut, it would totally work. Your Pi would execute the
command and you could call it a day. But! What if your script has output that you want to capture and see, like the python script
above? Or perhaps, training your model, your script prints out the training loss per epoch and the accuracy of the validation.
You'd want to see all of that content. And it might take a while to execute. How do we do this?
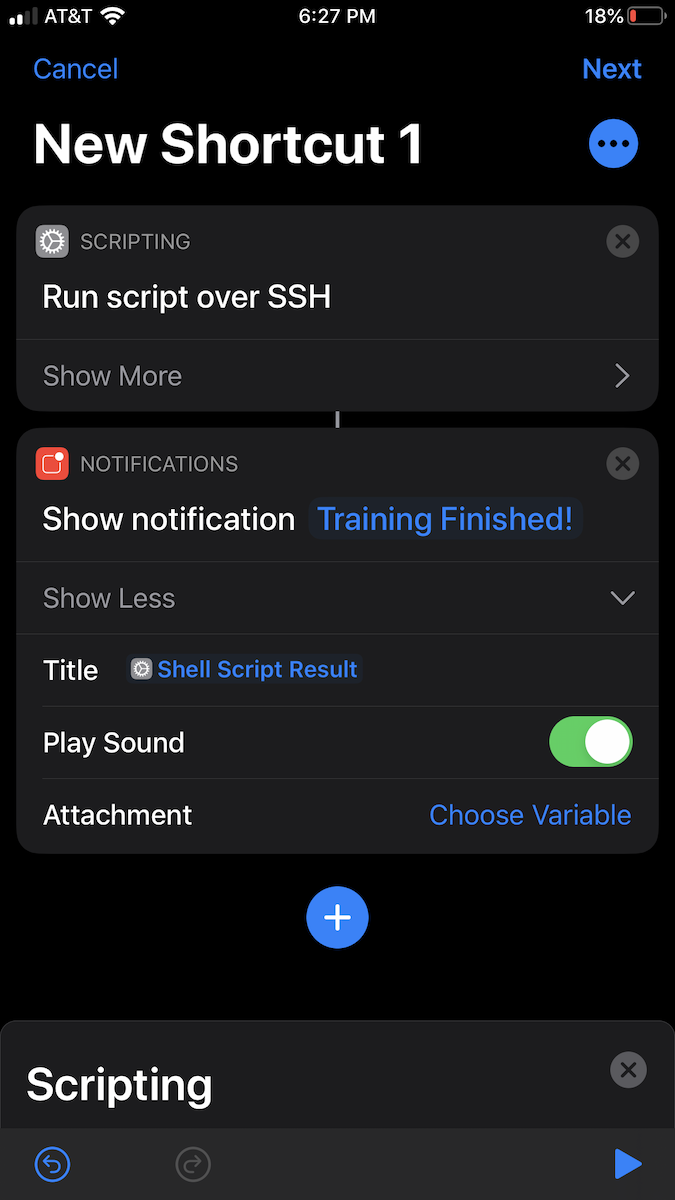
We're going to add another block called "Show Notification" (it's under the "Notification" section). You will be prompted to
supply a string in place of "Hello Word". I typed in "Training Finished!". Under "Show More", select "Title" and, in the
bar that pops up over the keyboard, select "Shell Script Result". Shortcuts will automatically wire the previous Action's
result to the current action. The "Shell Script Result" parameter represents the output of the script that ran. If you're
using the Python script above, that would be "Hey, isn't this awesome?", since it's printed out. Most importantly, the script above has a timeout
of 10 seconds. So now, you can close the app and, after 10 seconds, you'll get a push notification with the output information
from the script running remotely. Wild!
Here's what the final Shortcut looks like: The final Shortcut.
Step through the next prompts about saving the Shortcut, then you'll see it listed in your Shortcuts.
Note, if you wanted to tell Siri "Hey Siri, start training on the remote cluster", then just name the Shortcut
"Start training on the remote cluster". This is super cool approximately one time. And it's never cool in public.
Anyway, once it's saved go ahead and tap it!
If you've never done it before on your current network, you may get a notification about establishing the authenticity of the
remote server. That's fine, click Yes.
Moving forward
There are so many things I want to do with this. The next step for me is going to be setting this up with my research group's
server and writing a script that will send me emails with model artifacts once things are finished training. There are
location services based Actions you can use, and I can't wait to play with them. This has the
potential to automate a lot of tedious exercises. It's also super cool and a lot of fun.
If you're interested in keeping up with me, feel free to follow my Twitter account linked below! Twitter is also the
best way to reach me, so if you have questions or comments!